
How I met my SONiC
Last year, I happened to attend a Linux Future Meetup by PLVision where I became fascinated with new trends in computer networking. One of modern network architecture’s key components is a so-called white box switch. The idea behind it is that customers are able to buy a hardware switch of their choice and install an open-source version of a network operating system (NOS). This disaggregated approach reduces costs but, more importantly, provides great flexibility for future software upgrades and extensions with new features. At this point, an open source innovation from Microsoft, SONiC is the most popular open-source NOS which is currently being developed by a community of network market leaders: Broadcom, Marvell, Dell, Mellanox/NVIDIA, Intel and others. Therefore, I decided to join this initiative as well.
I worked really hard to get into SONiC Program organized by PLVision. It is an on-the-job training initiative, conducted by PLVision experts, that focuses on Microsoft’s SONiC (Software for Open Networking in the Cloud). I really enjoyed my several intensive weeks spent with mentors and new colleagues. They offered everything I needed for daily development and testing tasks. This includes but is not limited to: dockers, Linux networking, SAI architecture, SONiC architecture and provisioning, SONiC testing and much more.
A Data Center in the palm of your hand
It’s no secret – in order to learn something new, it’s crucial to gain not only theoretical knowledge but also hands-on experience. Fortunately, besides multiple hardware platforms and devices contributed by OEM/ODM and ASIC vendors, the SONiC community implemented a virtual SONiC switch platform that can be run either as a Docker container or as a KVM image. This SONiC Virtual Switch (VS) is actively used by the community for SONiC unit testing and new features development. SONiC VS is implemented as a vslib library that is linked with syncd daemon at the SONiC build stage. In most cases, this library only stores SAI configuration data pushed by SONiC. In turn, Linux networking stack entries, installed by SONiC (routes, ARP entries, etc), are used to make forwarding decisions for data plane traffic.
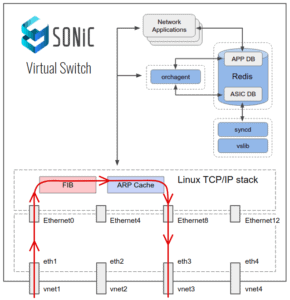
Image 1. SONiC Virtual Switch
To really have fun with SONiC OS exercising and configuration, it’s better to create virtual topology that emulates a simple but real-life scenario like, for instance, a data center Clos topology. And, there are a few ways to do that. But GNS3 (Graphical Network Simulator) is probably the most famous platform to emulate, configure, test and troubleshoot virtual and real networks. It’s also used frequently for learning and teaching. GNS3 allows running a small topology, consisting of only several devices on a laptop, to those topologies that include many devices hosted on multiple servers or even hosted in the cloud. GNS3 is an open source software which you can download and use for free – with the source code available on GitHub.
To start using SONiC NOS as a GNS3 appliance, you need to either build or, better, download a pre-built version of SONiC VS from Azure Jenkins:
                                   wget
       https://sonic-jenkins.westus2.cloudapp.azure.com/job/vs/job/buildimage-vs-201911/181/artifact/target/sonic-vs.img.gz
       gunzip sonic-vs.img.gz
Once that step is complete, you should enable SONiC VS as a networking appliance in the GNS3 environment:
                                   wget
       https://raw.githubusercontent.com/Azure/sonic-buildimage/master/platform/vs/sonic-gns3a.sh
       ./sonic-gns3a.sh -b <path to sonic.img>
Then, import SONiC appliance into GNS3.
I skipped DC (data center) topology configuration steps since lots of training materials are available on the internet.

Image 2. SONiC DC topology in GNS3
Once the system boots, configurations will be loaded from the /etc/sonic/config_db.json file into Redis DB namespace called ConfigDB. Generally, content in config_db.json can be considered as a startup configuration. Whereas, the current state of ConfigDB can be considered as a running configuration. In fact, each time you change SONiC configuration from CLI, you change ConfigDB content which won’t be written back into a config_db.json file automatically. To save current ConfigDB back into config_db.json, you should run:
sudo config save -y
After the first boot, run the above-mentioned command once and then delete the automatically generated router interfaces from /etc/sonic/config_db.json.
Also, the default configuration will contain the same router MAC address for all SONiC VS instances. Therefore, you should modify the DEVICE_METADATA section to make the MAC address unique for each router in the topology. Apart from that, you must also define the BGP local AS number in this section.
                                   "DEVICE_METADATA": {
               "localhost": {
                   "bgp_asn": "64002",
                   "default_bgp_status": "up",
                   "default_pfcwd_status": "disable",
                   "hostname": "sonic",
                   "hwsku": "Force10-S6000",
                   "mac": "52:54:00:12:34:51",
                   "platform": "x86_64-kvm_x86_64-r0",
                   "type": "LeafRouter"
               }
           },
Besides this, you must change the Loopback interface IP address to make sure all routers have unique IDs:
                                   "LOOPBACK_INTERFACE": {
               "Loopback0": {},
               "Loopback0|10.1.0.2/32": {}
           },
To clear the current ConfigDB configuration and apply a previously saved config file (SONiC services will be restarted), use:
sudo config reload -y
Since our topology is symmetric and all switches will have very similar configurations, I’ll provide the steps on how to configure only one ToR (top of the rack) switch.
Intra-rack switching
Let’s proceed with the L2 part of configuration by configuring VLAN through SONiC CLI, adding ports that connect our virtual hosts (located in one DC rack as VLAN members) and checking how this is mapped into the VLAN filter Linux networking feature.
                                   config vlan add 100
       config vlan member add -u 100 Ethernet12
       config vlan member add -u 100 Ethernet16
       config vlan member add -u 100 Ethernet20
       show vlan brief
To check VLAN configuration from Linux perspective (VLAN filter), use:
bridge vlan list
As you can see, handling large numbers of VLANs in a virtual environment doesn’t require people to create dozens of VLANs and bridges anymore. With the VLAN filter, you can control all VLANs on one bridge – a new feature introduced in Linux kernel 3.8, which is used effectively in the SONiC environment as well.
The default configuration contains an entry in the ebtables that block ARP packets to be forwarded between L2 interfaces:
ebtables --list
The expected output will be:
                                    Bridge chain: FORWARD, entries: 3, policy: ACCEPT
       -d BGA -j DROP
       -p ARP -j DROP
       -p 802_1Q --vlan-encap ARP -j DROP
To enable ARP packet forwarding, run the following command:
ebtables --delete FORWARD 2
Now, let’s apply hosts configuration which is pretty simple:
                                   PC1> ip 10.0.0.11 255.255.255.0 gateway 10.0.0.1
       PC2> ip 10.0.0.12 255.255.255.0 gateway 10.0.0.1
       PC3> ip 10.0.0.13 255.255.255.0 gateway 10.0.0.1
At this point, the intra-rack traffic should pass through. This can be checked by running ping from one host to another host located in the same DC rack.
As you can see in our topology, each ToR switch is connected to one of the Leaf switches – via LAG – which includes two LAG members. So, let’s configure it:
                                   config portchannel add PortChannel0001
       config portchannel member add PortChannel0001 Ethernet0
       config portchannel member add PortChannel0001 Ethernet4
       show interfaces portchannel
Inter-rack switching
ToR switch L2 configuration is now complete, so let’s move on to the L3 part of the configuration. First of all, create L3 interfaces (router interfaces or RIFs) on your switch. In this case, there will be three types of RIFs available: Port RIF, LAG RIF and VLAN RIF.
                                   config interface ip add Ethernet8 32.0.0.1/24
       config interface ip add PortChannel0001 12.0.0.2/24
       config interface ip add Vlan100 10.0.0.1/24
       show ip interfaces
       show ip route
Next, configure the BGP session for dynamic routing. Before configuring the neighbors, save the previous configurations:
sudo config save -y
Now you can add neighbors into the BGP_NEIGHBOR sections in the /etc/sonic/config_db.json file:
                                   "BGP_NEIGHBOR": {
               "12.0.0.1": {
                   "asn": "64001",
                   "holdtime": "180",
                   "keepalive": "60",
                   "local_addr": "12.0.0.2",
                   "name": "Leaf1",
                   "nhopself": "0",
                   "rrclient": "0"
               },
               "32.0.0.2": {
                   "asn": "64003",
                   "holdtime": "180",
                   "keepalive": "60",
                   "local_addr": "32.0.0.1",
                   "name": "Leaf2",
                   "nhopself": "0",
                   "rrclient": "0"
               }

       }
Afterwards, apply these changes by executing the following commands:
                                   sudo config reload -y
       show ip bgp summary
Once that step is complete, enter vtysh FRR shell and enable redistribution of the connected routes for BGP ASN (as of now, SONiC does not contain its own CLI command to configure this):
                                   sonic# configure terminal
       sonic(config)# router bgp 64002
       sonic(config-router)# address-family ipv4 unicast
       sonic(config-router-af)# redistribute connected
       sonic(config-router)# end
       sonic#write
At this point, the inter-rack traffic should pass through. This can be checked by running ping from one host to another host located in the different DC rack.
Conclusion
Despite SONiC Virtual Switch having significant limitations in both performance and its list of supported features, it is still a great fit to start exploring SONiC network OS internals and configuration approaches via practice. By enabling SONiC VS as a GNS3 appliance, we gain even more flexibility to emulate multi-switches in real-life networking scenarios on a single PC.

- SONiC Network OS Configuration: Is It Easy? - November 4, 2020