
Moving on with OpenDaylight Hydrogen exploration, we would like to share with you a simple yet useful solution – WebUI and CLI for OpenDaylight Virtual Tenant Network Coordinator.
Working with the OpenDaylight VTN Coordinator, we often lacked a convenient user interface, since the publicly available VTN Coordinator doesn’t provide one. The only available option is a programmatic RESTful API which is rather machine-oriented. You can use any REST client – either command-line – curl or a browser extension – postman, but they are not user-friendly, and not suited for experiments and quick prototyping on top of the VTN Coordinator. In this post we present a quick and easy way of building a minimalistic user interface which provides visualization of network topology as well as a simple CLI.
Prerequisites
Refer to our previous blog post for guidelines on installing the OpenDaylight controller with VTN Coordinator. We are also going to need Mininet for simulating an OpenFlow-based network.
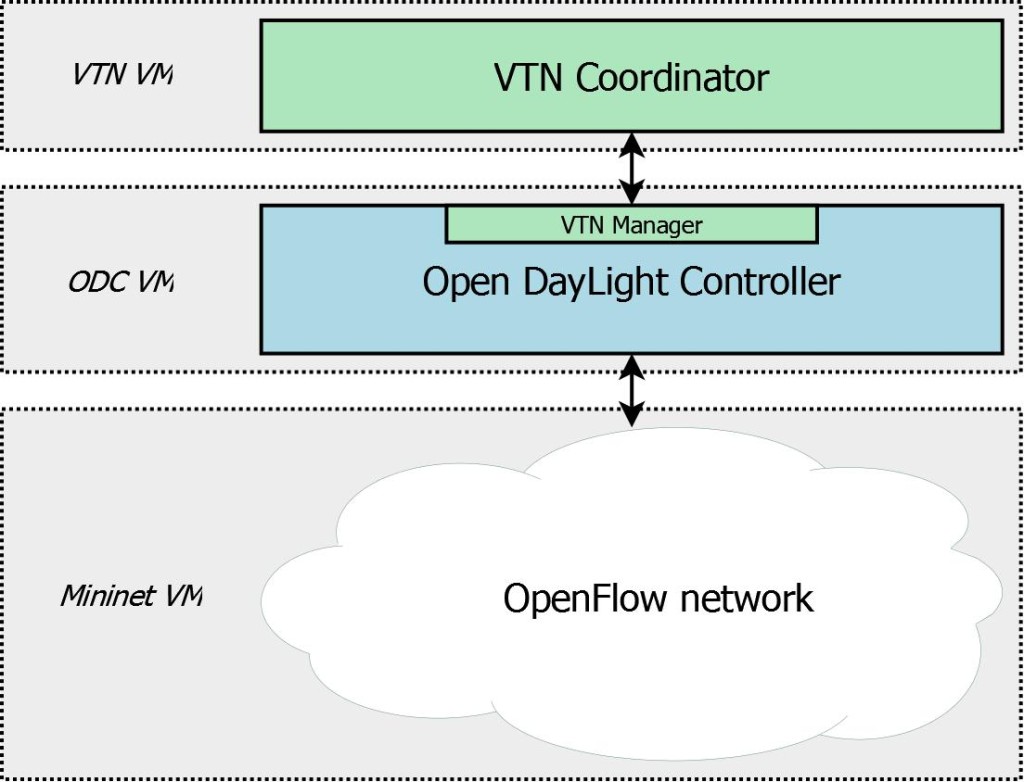
Test Environment
Three VMs were used to run all the applications and components needed to experiment with VTN Coordinator:
• VTN VM – virtual machine running VTN Coordinator;
• ODC VM – virtual machine with Open Daylight Controller;
• Mininet VM – virtual machine emulating OIpenFlow network with Mininet.
Network Topology Visualization
The OpenDaylight’s native Web UI has a significant disadvantage on the part of network topology visualization: the topology is displayed in a chaotic manner. It is possible to reorder the network nodes manually and save their location for future use, but this approach is completely inconvenient for day-to-day usage when network topology is changing dynamically.
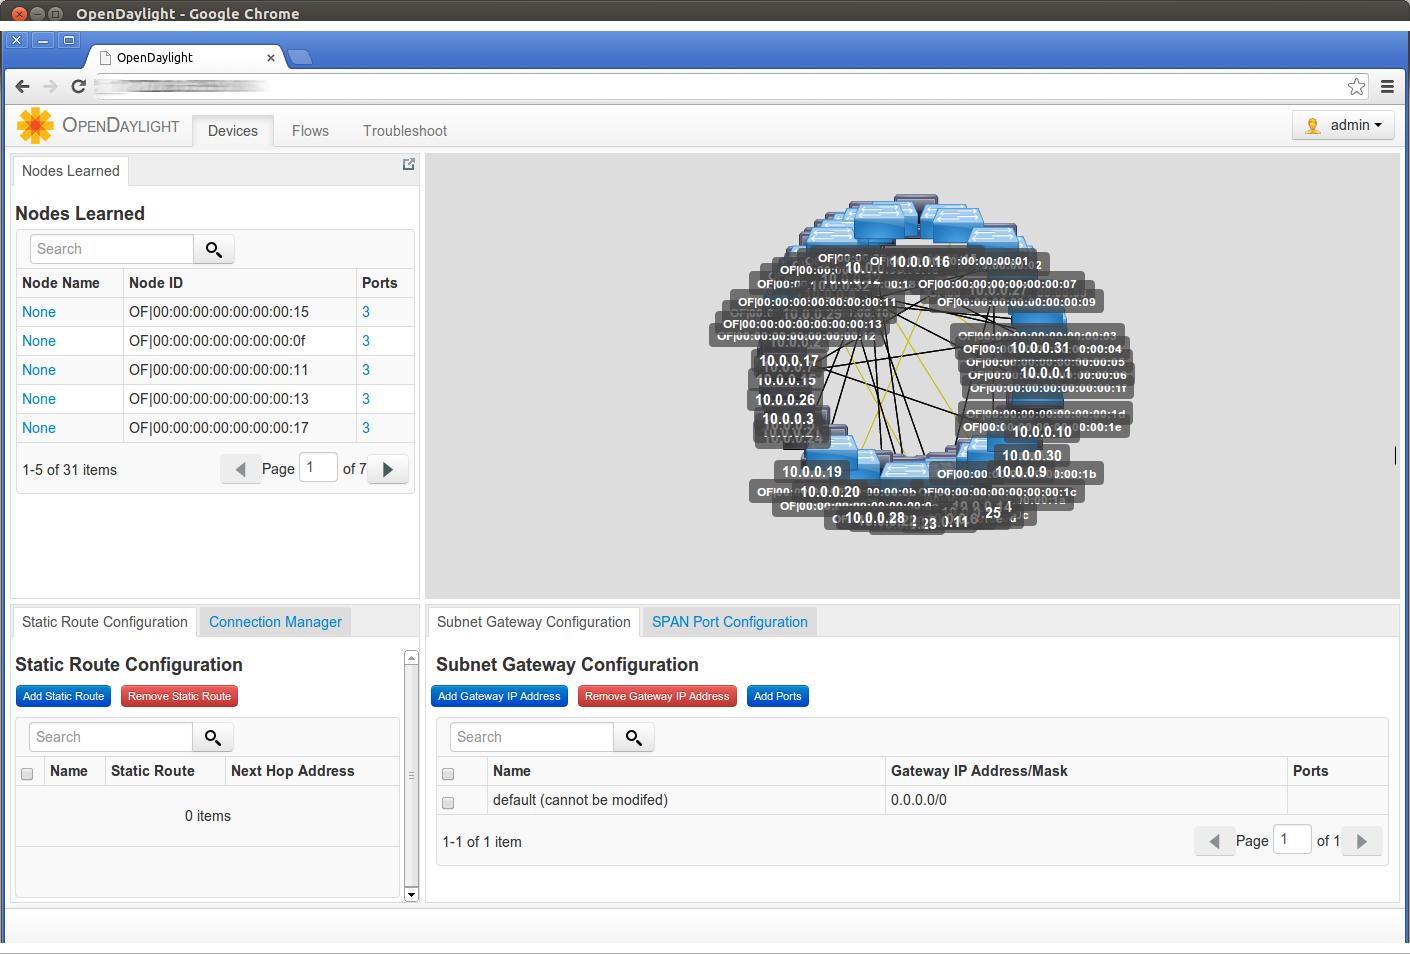
As a part of VTN UI, we offer a simple but handy network topology visualization tool. This tool is based on D3.js JavaScript library, which allows interactive visualization of the network topology data. The network nodes are dynamically ordered using D3 force-directed layout.
The simplest way to try out the advantages of such approach is to start the VTN Web UI, which will be launched in demo mode by default. It can build a simple 3-level network tree topology for demonstration purposes. The demo mode uses hard-coded data, and thus does not require a real OpenDaylight controller or VTN coordinator to be deployed. For more details, refer to “Putting it all together: VTN WebUI and CLI” section.
The following key combinations are available for manipulating the position of network nodes:
• ctrl+1 – freeze network nodes position;
• ctrl+2 – unfreeze network nodes position;
• Drag node with Ctrl button pressed – freeze node at new position;
• Double-click on frozen node – unfreeze node position.
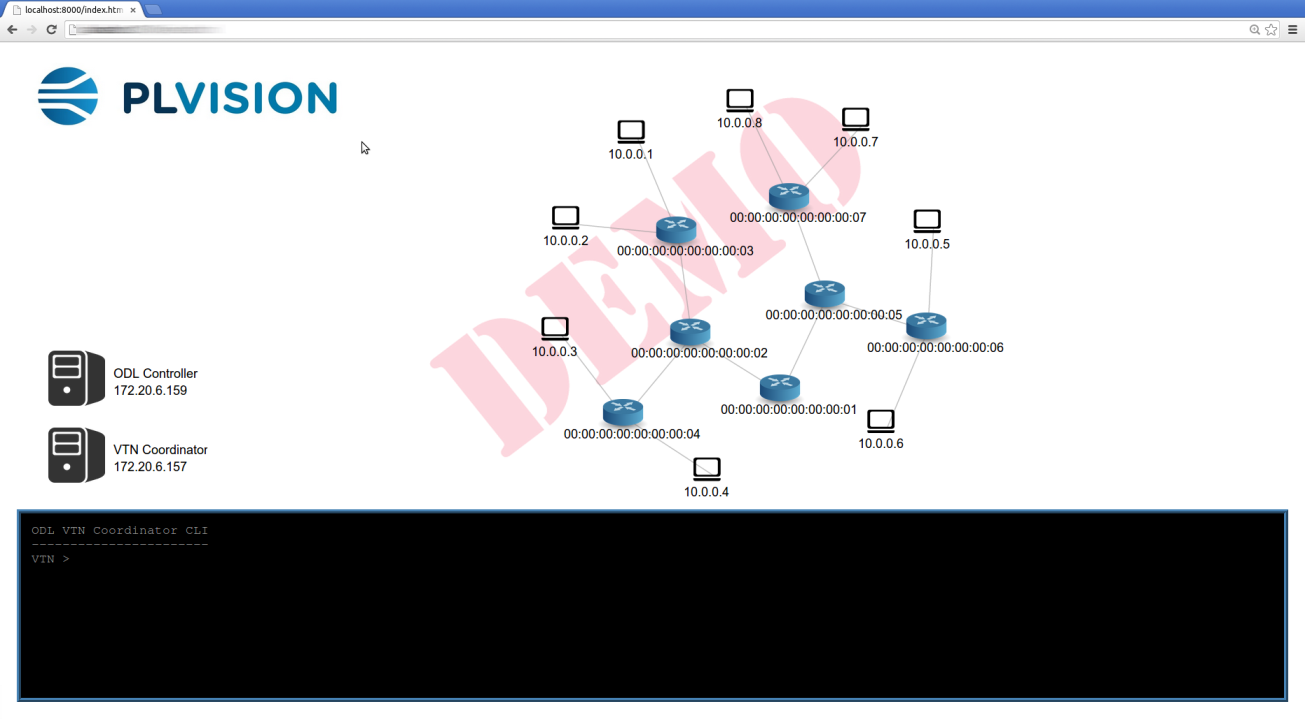
To switch the VTN GUI from the demo mode to the normal mode, you need to execute the following CLI command:
set_demo false
Then, specify OpenDaylight controller’s IP address as follows to retrieve real network topology:
crt_ctl [controller_id] [IP address]
NOTE: It’s not mandatory to set VTN coordinator’s IP address to get the current topology view. The network topology data is queried directly from OpenDaylight controller.
VTN Command Line Interface
The VTN Coordinator exposes configuration options via RESTfull interface. Refer to wiki.opendaylight.org for complete list of functions provided by VTN Coordinator. Linux curl utility is one of the simplest ways to modify VTN configuration.
curl -v -X POST -H 'content-type: application/json' -H 'username: admin' -H 'password: adminpass' -H 'ipaddr:<VTN_IP_ADDR>' -d '{"controller": {"controller_id": "<CONTROLLER_ID>", "ipaddr":"<ODC_IP_ADDR>", "type": "odc", "version": "1.0", "auditstatus":"enable"}}' http:// <VTN_IP_ADDR>:8080/vtn-webapi/controllers.json
Where major parameters are:
• VTN_IP_ADDR – IP address of VTN coordinator
• ODC_IP_ADDR – IP address of Open DayLight Controller
• CONTROLLER_ID – IP address of Open DayLight Controller.
There are more configuration options in real life – provided are just defaults for sample installation.
The aforementioned approach is okay for scripting or one-time configuration, but it’s not very convenient for manual configuration and experimenting. Wish I had a good-old CLI for this ![]()
JQuery Terminal Emulator plugin provides a quick and easy way to create a command-line shell in your browser. All you need is to define a set of commands, implement handlers, and provide help.
For instance, the command that adds a controller (crt_ctl) is implemented in JavaScript like this:
                            function vtn_crt_ctl(param1, param2) {
	var post_data =  JSON.stringify({
		controller: {
			controller_id: param1,
			ipaddr: param2,
			type: 'odc',
			version: '1.0',
			auditstatus: 'enable'
		}
	});
	$.ajax({
		url: vtn_coord_base_URI + '/vtn-webapi/controllers.json',
		type: 'POST',
		dataType: 'json',
		headers: vtn_coord_hdr,
		processData: false,
		data: post_data
	}).done(function( data ) {
		vtn_terminal.echo(JSON.stringify(data));
	});
}
It simply collects the required parameters and uses jQuery.ajax() request to perform an HTTP request.
Once all command handlers are implemented, you need to associate them with terminal commands and launch a CLI instance:
                            var vtn_cli_commands = {
	help:       	vtn_help,
	lst_ctls: 		vtn_list_ctls,
	crt_ctl:  		vtn_crt_ctl,
...
};

// Init terminal object and attach it to #vtn_term ID
jQuery(document).ready(function($) {
	vtn_terminal = $('#vtn_term').terminal(vtn_cli_commands, term_cfg);
});
Now you have a simple command for adding a controller with the following syntax:
crt_ctl [controller_id] [IP address]
Use help list to view all available commands:
                            VTN > help
help        - Prints this help: help
echo        - Sample echo function: echo [string]
set_co        - Set VTN Coordinator IP: set_co [IP address]
crt_ctl        - Create Controller: crt_ctl [controller_id] [IP address]
dlt_ctl        - Delete Controller: dlt_ctl [controller_id]
crt_vtn        - Create a VTN: crt_vtn [VTN name] [description]
lst_vtns        - List VTNs: lst_vtn
crt_vbr        - Create vBridge: crt_vbr [bridge name] [controller ID]
lst_vbrs        - List vBridges: lst_vbrs
crt_vbr_if        - Create Interface on vBridge: crt_vbr_if [VTN name] [bridge name] [interface name] [interface desccription]
lst_vbr_ifs        - List vBridge interfaces: lst_vbr_ifs [VTN name] [bridge name]
lst_lports        - List of logical ports configured: lst_lports [controller_id]
map_vif2lport        - Map vBridge virtual interfac to the controller's logical port: map_vif2lport [VTN name] [bridge name] [interface name] [lport ID]
Refer to GitHub for complete implementation.
Putting it All Together: VTN WebUI and CLI
In this example, separate virtual machines are used for ODC, VTN, and Mininet. Make sure all the components are started and working properly:
• ODC VM
sudo odl-hyd-virt -virt vtn
• VTN VM
                            sudo /usr/local/vtn/bin/vtn_start
sudo /usr/share/java/apache-tomcat-7.0.39/bin/catalina.sh start
• Mininet VM
sudo mn --controller=remote,ip=172.20.6.159 --topo tree,2
You can HOST the VTN GUI ON A Web server but it’s simpler to start it right in a browser from a local filesystem. Most browsers have limited JavaScript cross-domain and local file requests (file:// URIs cannot read other file:// URIs). You need to disable these features in order to try out the GUI from a local filesystem. Also, the VTN GUI uses cookies for storing its state. In some browsers (e.g. Chrome) cookies are not allowed on file:// by default, so we have to enable them.
For example, for Chrome browser in Windows environment use the following command line options:
"C:\Program Files (x86)\Google\Chrome\Application\chrome.exe" --disable-web-security --allow-file-access-from-files --enable-file-cookies
Once all the components are started, there is no connectivity between hosts in Mininet and you cannot not see them in the network topology view:
                            mininet> h1 ping -c 3 h3
PING 10.0.0.3 (10.0.0.3) 56(84) bytes of data.
From 10.0.0.1 icmp_seq=1 Destination Host Unreachable
From 10.0.0.1 icmp_seq=2 Destination Host Unreachable
From 10.0.0.1 icmp_seq=3 Destination Host Unreachable

--- 10.0.0.3 ping statistics ---
3 packets transmitted, 0 received, +3 errors, 100% packet loss, time 2016ms
pipe 3
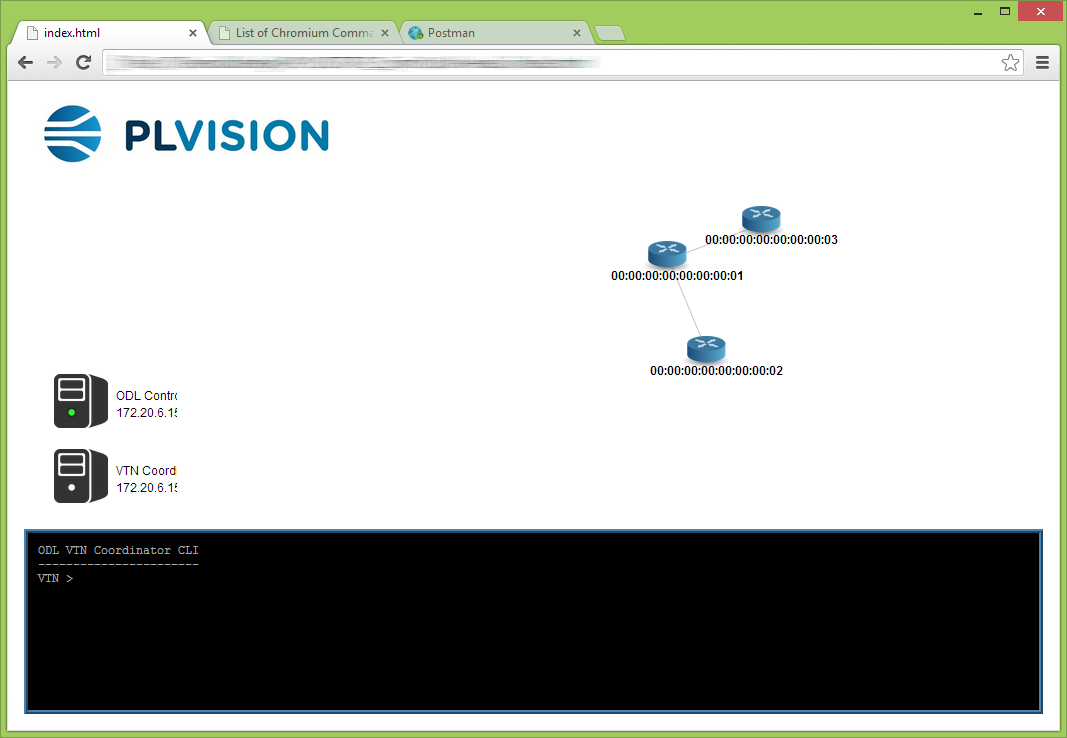
Now we will use the VTN CLI for creating the same VTN network.
At first, configure Coordinator’s IP address:
set_co [IP address]
Add a controller with ID controller_1 and create a test VTN:
                            crt_ctl controller_1 [IP address]
lst_ctls
crt_vtn vtn1 "test VTN"
lst_vtns
NOTE: You can create several controllers with different IDs and IP addresses, but the WebUI will use only the last configured controller for retrieving and visualizing network topology. IP addresses of VTN coordinator and ODC are stored in cookies to persist during browser restart or page reload.
Create a virtual bridge for controller_1and add two virtual interfaces for vtn1:
                            crt_vbr vBr_1 controller_1
lst_vbrs
crt_vbr_if vtn1 vBr_1 if_1 vbr1_if1
crt_vbr_if vtn1 vBr_1 if_2 vbr1_if2
Now associate the virtual interface with controller_1 logical ports:
                            lst_vbr_ifs vtn1 vBr_1
lst_lports controller_1
map_vif2lport vtn1 vBr_1 if_1 "PP-OF:00:00:00:00:00:00:00:03-s3-eth1"
map_vif2lport vtn1 vBr_1 if_2 "PP-OF:00:00:00:00:00:00:00:03-s2-eth1"
This will bring up connectivity between h1 and h3 while keeping hosts not connected to the virtual bridge inaccessible:
                            mininet> h1 ping -c 3 h3
PING 10.0.0.3 (10.0.0.3) 56(84) bytes of data.
64 bytes from 10.0.0.3: icmp_req=1 ttl=64 time=0.778 ms
64 bytes from 10.0.0.3: icmp_req=2 ttl=64 time=0.085 ms
64 bytes from 10.0.0.3: icmp_req=3 ttl=64 time=0.086 ms

--- 10.0.0.3 ping statistics ---
3 packets transmitted, 3 received, 0% packet loss, time 2000ms
rtt min/avg/max/mdev = 0.085/0.316/0.778/0.326 ms

mininet> h1 ping -c 3 h4
PING 10.0.0.4 (10.0.0.4) 56(84) bytes of data.
From 10.0.0.1 icmp_seq=1 Destination Host Unreachable
From 10.0.0.1 icmp_seq=2 Destination Host Unreachable
From 10.0.0.1 icmp_seq=3 Destination Host Unreachable

--- 10.0.0.4 ping statistics ---
3 packets transmitted, 0 received, +3 errors, 100% packet loss, time 2015ms
pipe 3

And you’ve made it! The VTN Coordinator WebUI and CLI are fully configured and are awaiting your command, literally ![]() Hopefully, this solution will make your OpenDaylight experience a little easier. Got any questions – let us know.
Hopefully, this solution will make your OpenDaylight experience a little easier. Got any questions – let us know.
References

- 10 Reasons NOT to Deploy
SONiC NOS in Your Network - July 12, 2024 - Choosing the Right SONiC Version for Your Network Infrastructure - May 15, 2024
- SONiC-DASH: Integration for a DPU in 4 Steps - January 23, 2023