
In our previous post, we demonstrated how the DPDK-based virtual Firewall (vFW), one of the components of OPNFV Sample Virtual Network Function (SampleVNF) Project [1], can be deployed on the next-generation NXP’s QorIQ LS1046A reference design board. We also mentioned the necessity to evaluate its performance metrics on the given hardware platform.
Over the past years the network infrastructure of communication service providers has changed, having matured from applications running on purpose-built hardware to VNFs that can be run on standard white-box servers. One of the first commercially viable applications of this approach is the concept of Universal Customer Premises Equipment (uCPE), enabling operators to offer their services as VNFs running on devices located at customers’ site. As the implementation of uCPE becomes more widespread, service providers are looking for flexible CPE devices that meet their power and performance requirements. Therefore, the measurement of VNF performance characteristics on a particular platform is the key component of successful NFV-based deployment in the Telco environment.
The benchmarking methodology for network interconnection devices is defined by the Internet Engineering Task Force’s (IETF) RFC2544 technical report. The outputs of the process are the following performance metrics: throughput, latency and frame loss ratio. One of the tools that enable getting the above-mentioned metrics is Network Service Benchmarking (NSB), an extension to OPNFV Yardstick framework [2]. Utilizing it, we have evaluated the performance of the ARM-based NXP platform and found it suitable for VNF deployments on the edge. Even a quite trivial 4-core system is capable to process traffic at line rates (10G) with small performance degradation on minimal frame sizes. This proves that the NXP’s QorIQ family is a good fit for running high performance DPDK-based VNFs and is powerful enough to deal with the universal customer premises equipment cases for carriers and service providers.
Hereafter, we describe the steps we followed to conduct the performance analysis of the vFW SampleVNF running on the ARM-based platform, as well as provide the results achieved.
Hardware components
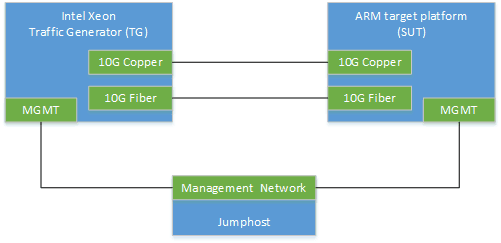
The basic RFC2544 [3] setup requires at minimum 2 nodes connected to each other by two links. The first node is a traffic generator (TG) and the second one is a platform, the performance of which is to be characterized. The Yardstick tool also requires an additional node, the Jumphost, which is used for running the Yardstick framework itself. This node should have management connection to both devices. The described setup configuration is illustrated in the picture below.
Traffic Generator
The traffic generator platform should be capable of sending and receiving 20Gbit line rate of bidirectional traffic via installed 10Gbit NICs. The selected platform is Intel Xeon CPU with 16G of RAM installed on the board. Also 2x10G ports copper and 2x10G ports fiber NICs have been installed on that platform to enable back to back connection with the target platform.
Jumphost
There are no specific hardware requirements to a Jumphost server. Therefore, a desktop machine with 2G of RAM installed would be a good choice to run the Yardstick framework.
Software components
There are different open source tools to characterize the performance of networks like iperf3 [4], netperf [5] etc. The Yardstick NSB extension has been selected as a tool that best meets our testing requirements to conduct the benchmarking of VNFs, network functions virtualization infrastructure (NFVI), and network services. This tool also supports different types of DPDK-based traffic generators, such as Cisco Trex [6] and SampleVNF PROX [10], that produce high traffic line rate to benchmark VNFs using high-speed (10G) network ports. We have chosen the Trex traffic generator.
Before we start
To characterize the target platform, the following stages are to be performed:
- Preparation of the TG/ARM/Jumphost systems for the test
- Installation of the test framework on Jumphost and description of the topology
- Configuration of the SampleVNF application and running it on the target platform
- Running the set of test cases and gathering metrics
- Analysis of the results obtained
Pre-requirements
The Ubuntu 16.04 LTS OS should be installed on the TG and Jumphost servers before deploying the Yardstick framework. Also, the Python interpreter should be installed on the TG to enable running Ansible scripts. The target ARM platform should be configured manually by using the guide described in our previous post.
Yardstick installation
Download the latest version of Yardstick and install it on the Jumphost machine. According to the Yardstick documentation [7], the installation procedure looks straight forward and depends on the selected installation method. Yardstick supports three different installation environments:
- Install the framework directly on the Jumphost machine.
- Install Yardstick framework in virtual environment on the Jumphost.
- Pull Yardstick Docker image and run it on the Jumphost.
The easiest and fastest way to install the framework is to use a Docker container. The Yardstick image can be pulled directly from the Docker hub. However, as we are going to use the NSB extension of Yardstick, the recommended way is to use the NSB script which will do all the required installation for us. Also, this script will install all our pre-requirements on all our machines used for the performance characterization.
Download the Yardstick sources on the Jumphost machine:
                            # git clone https://github.com/PLVision/yardstick.git ~/yardstick
# cd ~/yardstick
# git checkout stable/gambia-arm
Following the Yardstick documentation, update the ansible inventory file and specify the host that will be used for benchmark testing. Please note, that the target ARM platform selected for the performance characterization is configured manually, as the Yardstick NSB installation script does not support it. Therefore, there is no need to mention the target platform in the inventory file, only the traffic generator and the Jumphost are to be specified. To do so, update the [yardstick-standalone] section of ansible/install-inventory.ini file as an example below.
                            [yardstick-standalone]
tg_host ansible_host=172.20.6.142 ansible_user=root
ansible_ssh_pass=abcd1234
As we have specified all the IP addresses, user names and credentials in the configuration file, let us dwell to the Yardstick framework installation by executing the following command:
# ./nsb_setup.sh -i opnfv/yardstick:opnfv-7.0.0
This NSB Yardstick script will install all the required Yardstick software on the hosts specified in the ansible inventory file and bring the Yardstick Docker container up. To enter the container, run the following command on the Jumphost:
# docker exec -it yardstick /bin/bash
InfluxDB and Grafana installation
By default, the Yardstick framework stores the test case results in JSON file on the filesystem. The framework also supports dispatching of the result to InfluxDB [8]. Storing results in InfluxDB allows to visualize them with Grafana [9].
To configure the InfluxDB and Grafana tools in Yardstick, the following two steps need to be performed inside the earlier deployed Yardstick container:
                            # docker exec -it yardstick /bin/bash
root@173540c60c0f:/home/opnfv/repos# cd yardstick
root@173540c60c0f:/home/opnfv/repos/yardstick# yardstick env influxdb
root@173540c60c0f:/home/opnfv/repos/yardstick# yardstick env grafana
The vFW DPDK-based application preparation
The configuration of the hardware platform running the vFW application is described in detail in our previous post. Follow the steps specified in Before we start section to get the application up and running.
RFC2544 benchmark testing performance
The Yardstick framework supports two modes of running vFW RFC2544 benchmark tests on the target platform:
- NSB driven mode – the framework configures and runs the vFW application automatically on the target platform before doing the actual benchmarking of the VNF. At the end the application is terminated and all the VNF KPIs are retrieved by the framework.
- Agnostic mode – the framework does not configure the VNF at all and treats the target platform as a black-box system under test (SUT).
Since our target platform is based on ARM architecture and the selected vFW application has been installed manually (the Yardstick NSB install does not support the NXP ARM platform), the second mode is the best fit for our case.
Yardstick setup configuration
Define the Yardstick POD configuration file with the description of TG and VNF machines:
                            # docker exec -it yardstick /bin/bash
root@173540c60c0f:/home/opnfv/repos# cd yardstick
root@173540c60c0f:/home/opnfv/repos/yardstick# mkdir -p /etc/yardstick/nodes
root@173540c60c0f:/home/opnfv/repos/yardstick# cp etc/yardstick/nodes/pod.yaml.nsb.arm.sample /etc/yardstick/nodes/pod.yaml
Modify the sample POD file to point to correct IP addresses of physical nodes and PCI addresses of used NICs on each node.
RFC2544 tests running
Everything is ready to perform the RFC2544 benchmark testing. As we are going to perform tests with different packet sizes, the Yardstick test suite feature can be used to run the collection of tests at the same time (in parallel).
Enter the Yardstick container on the Jumphost machine and run the benchmark test:
                            # docker exec -it yardstick /bin/bash
root@173540c60c0f:/home/opnfv/repos# cd yardstick
root@173540c60c0f:/home/opnfv/repos/yardstick# yardstick -d task start --suite ts_baremetal_rfc2544_ipv4.yaml 2>&1 | tee /tmp/yardstick.log
When the command succeeds, we can get the network KPIs and analyze the performance of the VNF application on the ARM platform.
Results visualization
As the test case results have been stored in the Influx database, we can easily show them on the Grafana dashboard running on the Jumphost machine. To check the HTTP port of the Grafana dashboard, please go to the Jumphost machine and visualize the list of running Docker containers:
                            # docker ps
CONTAINER ID  IMAGE                   ...  PORTS
84b4a83c81f7  grafana/grafana:4.4.3   ...  0.0.0.0:1948->3000/tcp
d9bffcabc162  tutum/influxdb:0.13     ...  0.0.0.0:8083->8083/tcp, ...
bde57a7119ac  opnfv/yardstick:latest  ...  5000/tcp, 5672/tcp
As we can see above, the Grafana dashboard is running on port 1948 and, therefore, is available at http://:1948/. The default credentials to access the Grafana dashboard are:
                            Username:admin
Password:admin
After having logged in, you can access the TC results on the ARM RFC2544 dashboard, which can be selected from the list of available dashboards.
Collection of test results
The TC results represented on the Grafana graph is not very informative in our case, since it does not provide data on the measured throughput value (PPS, Line Rate %) for a given packet size, visualizing only the measured throughput value for each test case iteration. Therefore, we have to extract the TC results from InfluxDB, manually find the best throughput value within the allowed drop percentage range for each specific packet size, calculate the line rate and display the data in a table or a graph. To extract the information from the DB and store it into the CSV file for manual processing, the following InfluxDB query can be used on Jumphost:
                            # docker exec -it d9bffcabc162 influx -format csv -database yardstick -execute 'select tg__0.collect_stats.RxThroughput,
tg__0.collect_stats.Throughput,tg__0.collect_stats.TxThroughput from tc_baremetal_rfc2544_ipv4_64B_trex'
The query above will work for 64-byte packet size only. To make it applicable to all packet sizes, the query should be repeatedly run with the tc_baremetal_rfc2544_ipv4_64B_trex test case name changed accordingly.
When the data is extracted, it can be represented using a table or a graph.
Final outcomes
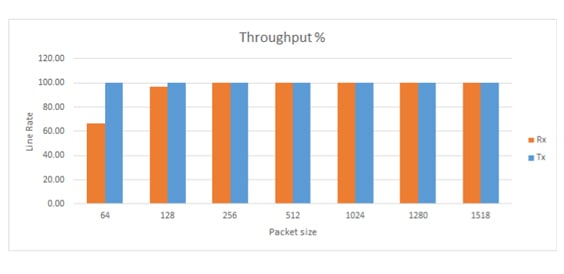
Throughput values for different packet sizes are shown on the graph below. The X-axis represents the packet size and Y-axis represents the actual throughput value:
Test configuration details
vFW SampleVNF:
- LoadBalancer Type: SW
- Total No.of Rules: 1
- Number of RxQ per port: 1
- Cores used:
0: Master & ARPICMP
1: TXRX
2: LOADB
3: vFW
NXP System:
- CPU: ARM Cortex A72 1.8GHz, 4 cores.
- OS version: Ubuntu 18.04.1 LTS
- Memory: 8Gb
Test case:
- Acceptable Frame Loss: 0.01-0.001%
- Traffic duration: 30 seconds
Suggested improvements
The performance characterization of the target platform was performed within basic configuration of vFW VNF parameters, such as number of rx queues per port, default flow rules etc. Changing these parameters can improve the performance and increase the load on the target platform, which, in turn, will impact the final results, enabling further analysis on how the target platform behaves with different kind of load and configuration. The results obtained can be compared to performance characteristics of different platforms, such as x86.
During the benchmarking process, we have also identified a gap in Yardstick. The framework does not support neither the installation of SampleVNF on ARM platform, nor running Trex traffic generator on different NIC types, even through this feature is supported by Trex software.
Conclusions
The DPDK-based SampleVNF vFW application has been successfully characterized on ARM platform by sending bidirectional traffic with packets of different size defined by RFC2544 standard and default number of flows generated by Yardstick framework. The results we received show that minimum 66.33% throughput line rate is achieved by flowing small packet size traffic and 100% lane rate (20Gbps on two 10G ports) on higher packet size traffic. This proves that VNF running on the ARM platform delivers not only flexibility, operability and speed of deployment, but also provides great network performance. Taking into account the outcome obtained, we can assert that next-generation ARM-based platforms are ready to be integrated into NFV ecosystem, specifically within the context of CPE use cases.
References
- [1] OPNFV Wiki: SampleVNF Project
- [2] OPNFV Wiki: Network Service Benchmarking
- [3] Benchmarking Methodology for Network Interconnect Devices
- [4] iPerf3 Corporate Website
- [5] Netperf Corporate Website
- [6] Trex Corporate Website
- [7] Lanner Electronics Blog: Delivering NFV Service Assurance with White-Box vCPE/uCPE Appliance
- [8] InfluxData Corporate Website
- [9] Grafana Enterprise Corporate Website
- [10] OPNFV Wiki: Packet pROcessing eXecution engine (PROX)

- VNF Performance Benchmarking for Arm-Based CPE Platform - December 21, 2019